Inhaltsverzeichnis Microsoft Word 2016 Weiterführung
Inhaltsverzeichnis Microsoft Word 2016 Weiterführung
1 Preliminary Notes
2 Lists
2.1 Numbering
2.2 Bulleting
2.3 Multilevel lists
2.4 Exercise
3 Borders and Shading
3.1 Page border
3.2 Background and watermark
4 Tables
4.1 Creating tables
4.2 Context tools
4.3 Moving within a table
4.4 Highlighting table items
4.5 Moving a table using the mouse
4.6 Borders and gridlines
4.7 Formatting tables
4.8 Table styles
4.9 Modifying tables
4.10 Sorting tables
4.11 Exercises
5 Multi-column Text
5.1 Specifying the column width
5.2 Inserting a column break
5.3 Exercise
6 Editing Tools
6.1 Spelling and grammar checking
6.2 Exercise
6.3 The Thesaurus
6.4 Exercise
7 Revision Features
7.1 Track changes
7.2 Review tab
7.3 Default settings
7.4 Entering comments
7.5 Accepting or rejecting changes
7.6 Exercises
7.7 Printing markups
7.8 Comparing two separate documents
7.9 Providing a document with password protection and enabling correction mode
7.10 Consolidating changes and comments made by different users
7.11 Preparing the document for distribution
7.12 Trust Center
8 Fields
8.1 Things worth knowing
8.2 Inserting a field
8.3 Major field codes
8.4 Editing the fields
9 Document Templates
9.1 Using document templates
9.2 Creating document templates
9.3 Displaying custom templates on the File menu
9.4 Editing document templates
10 Forms
10.1 Creating a form
10.2 Developer tab
10.3 Inserting form fields
10.4 Protecting the form
10.5 Using a form in a new document
11 Data Import and Export
11.1 Data import and export
11.2 Copying and cutting
11.3 OLE and DDE
11.4 Object Linking and Embedding – OLE
11.5 Dynamic data exchange – DDE
11.6 Exercise
11.7 Getting apps from the Office Store
12 Objects – Graphics, Images, Shapes, WordArt
12.1 Importing graphics
12.2 Picture Tools
12.3 Line break
12.4 Editing graphics
12.5 Picture compression
12.6 Shapes (AutoForm)
12.7 WordArt
12.8 SmartArt
13 Merge Text (Form Letters)
13.1 Variable
13.2 Field name
13.3 Main document
13.4 Mail Merge Wizard
13.5 Data source
13.6 Importing the records
13.7 Inserting data fields
13.8 Form letter preview
13.9 Printing form letters
13.10 Sorting records
13.11 Filtering records
13.12 Word fields in form letters
13.13 Label printing
13.14 Re-opening the main document
14 Outline
14.1 Things worth knowing
14.2 Outline view
14.3 Document structure
14.4 Creating an outline
14.5 Formatting headlines
14.6 Numbering the outline
14.7 Collapsing and expanding parts of the document
14.8 Exercise
15 Footnote Management
15.1 Creating footnotes or endnotes
15.2 Modifying footnotes or endnotes
15.3 Copying, moving, or deleting footnotes or endnotes
15.4 Converting footnotes or endnotes
15.5 Exercise
16 Tables of Contents and Indexes
16.1 Table of contents
16.2 Index
16.3 Table of figures
16.4 Cross-reference
16.5 Inserting a hyperlink to an item in a document
17 Master Documents and Subdocuments
17.1 Things worth knowing
17.2 Creating master document and subdocument
17.3 Master document views
17.4 Editing subdocuments
18 Macros
18.1 Recording macros
18.2 Running macros
18.3 Deleting macros
18.4 Editing macros
19 OneDrive and Microsoft Office 2016 Online
19.1 Saving to the Cloud (OneDrive)
19.2 Microsoft Office 2016 Online
20 Collaboration using the SharePoint Server
20.1 Opening SharePoint
20.2 Editing documents that are not locked
20.3 Checking out and checking in of a file
20.4 Simultaneous editing of documents
20.5 Activity task pane
20.6 Uploading documents to the SharePoint server
20.7 Synchronizing data
20.8 Exercises
21 Character Set Table
22 Appendix Solutions
23 Subject Index
Auszug aus den Schulungsunterlagen
Auszug aus den Schulungsunterlagen Microsoft Word 2016 Weiterführung
Creating footnotes or endnotes
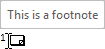
Position the cursor at the place, at which the footnote or endnote character is to be inserted.
Either click this small ![]()
![]() button on the References tab, Footnotes group.
button on the References tab, Footnotes group.
References tab
The Footnote and Endnote dialog box appears, which will be described on the next page.
![]()
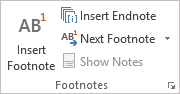
![]() Or click the Insert Footnote or Insert Endnote
Or click the Insert Footnote or Insert Endnote ![]()
![]() . button. Depending on the current view, the cursor will move to the footnote or endnote position:
. button. Depending on the current view, the cursor will move to the footnote or endnote position:
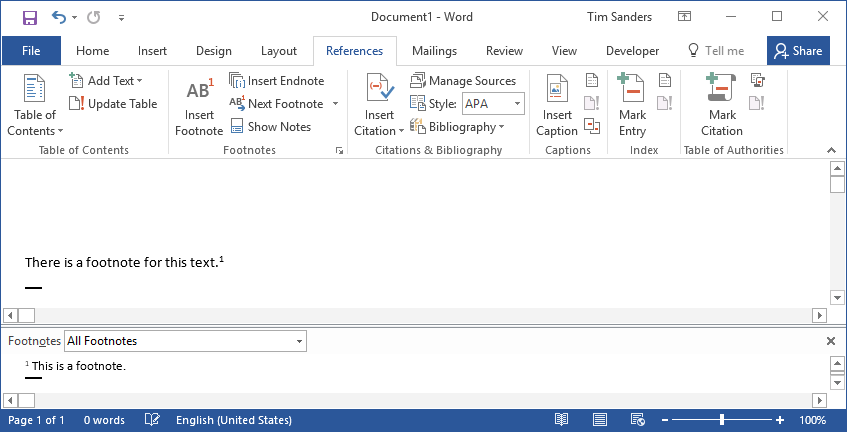
- If Print Layout View is active, Word automatically switches to the position below the footnote or endnote separator. Insert the text there:

- In Draft View, the footnote or endnote detail is opened. Type and format the text:
Modifying footnotes or endnotes
In Print Layout View, you may edit the footnote text directly by switching to the corresponding position within the document (page end, document end).
For more modifications, double-click ![]()
![]() the footnote or endnote character. Now the cursor is flashing in the footnote or endnote text:
the footnote or endnote character. Now the cursor is flashing in the footnote or endnote text:
- In Draft View, the footnote or end note detail containing the respective footnote text is displayed now, and you may modify or format the text as desired.
- In Print Layout View, Word moves to the position of the footnote or endnote text.
For footnote or endnote characters, you may choose numbers or special characters. In case you want to use special characters, please note that these will not be numbered:
Click this small ![]()
![]() icon on the References tab, Footnotes group. The following dialog box is opened:
icon on the References tab, Footnotes group. The following dialog box is opened:
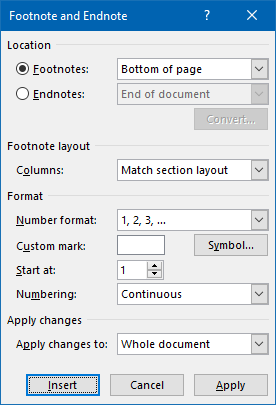
Only when you use this method to insert a new footnote or endnote into your document, you may specify in Location, whether you use a ![]()
![]() Footnote or an
Footnote or an ![]()
![]() Endnote . Below you will find a description how to convert existing footnotes or endnotes. In any case, the position of the footnote or endnote can be changed using the list box in the Location pane.
Endnote . Below you will find a description how to convert existing footnotes or endnotes. In any case, the position of the footnote or endnote can be changed using the list box in the Location pane.
Use the ![]()
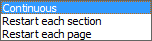
![]() aNumber format list box to choose, whether the footnotes should be numbered automatically, and specify the numbering format and the type of numbering. Or use the Custom mark option to enter an icon, e.g. *, to be used for the footnote or endnote character.
aNumber format list box to choose, whether the footnotes should be numbered automatically, and specify the numbering format and the type of numbering. Or use the Custom mark option to enter an icon, e.g. *, to be used for the footnote or endnote character.
Do you want to use a special character for the footnote or endnote character? Then click the Symbol button and use the Symbol dialog box to choose the desired character.
In the Footnote and Endnote dialog box, click Insert.
When you use the mouse to point onto the footnote or endnote character in the text, an additional icon will appear next to the mouse pointer showing the footnote or endnote text in a ScreenTip.
including ScreenTip
Editing footnote or endnote separators
By default, Word places a 2ʺ long separator between the normal text and the footnote text. But you may customize or delete this separator:
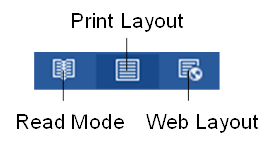
Switch to the draft view by clicking Draft view button on the View tab.
Double-click ![]()
![]() the footnote or endnote icon. Now the cursor is flashing in the footnote or endnote detail.
the footnote or endnote icon. Now the cursor is flashing in the footnote or endnote detail.
From the single-row list box ![]()
![]() , select the Footnote Separator entry. The separator is displayed without the footnotes text.
, select the Footnote Separator entry. The separator is displayed without the footnotes text.
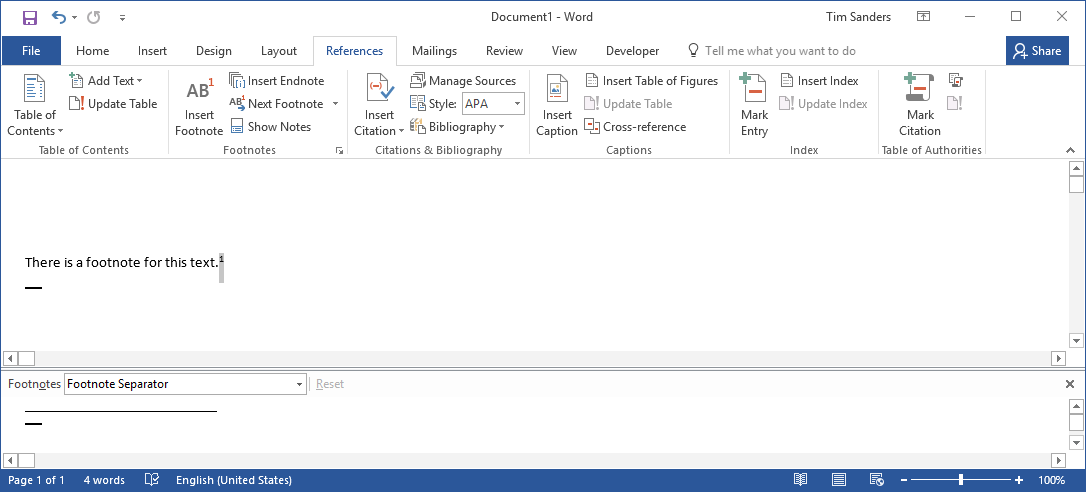
Select the separator and press the Del key to delete the separator.
If you want to enter another separator, you may enter it as desired now (e.g. double line, line across the entire page width, a number of special characters, etc).
To restore the default separator, click Reset.
Switch to the document by clicking the button in the footnote or endnote section at the bottom, or click the Print Layout button on the status bar.
Mit dem englischsprachigen Schulungsmaterial Word 2016 für Fortgeschrittene bringen Sie Anwender innerhalb kurzer Zeit auf ein höheres Leistungsniveau
Firmen und Bildungseinrichtungen setzen neben einer anerkannten Textverarbeitung wie Word aus der Office 2016 Familie auf grenzüberschreitendes Teamwork. In vielen Bereichen hat sich Englisch zum Standard für Kommunikation entwickelt. Mit englischsprachigen Kursunterlagen aus dem Dettmer-Verlag gestalten Sie Ihre IT-Schulungen optimal für Personen, deren Muttersprache Englisch ist. Ebenso fördern Sie Menschen, die Englisch als Fremdsprache im Arbeitsalltag nutzen.
Die Schulungsunterlagen für Word 2016 Weiterführung in englischer Sprache bauen auf Basiswissen im Umgang mit der Software auf. Ihre Kursteilnehmer erweitern ihre Fähigkeiten mit dem Erstellen von Listen und Tabellen. Gezielt deren Eigenschaften und Formate anzupassen, hilft beim Lösen von Problemen in der täglichen Arbeit. Word besitzt mit dem Überarbeiten von Dokumenten großes Potenzial, wenn mehrere Nutzer Dateien gemeinsam bearbeiten wollen. In logisch aufgebauten Kapiteln mit erklärenden Übungsaufgaben zeigt das Schulungsmaterial, welche Details und Schritte zum perfekten Ergebnis führen.
Mit Hilfe der gut verständlichen Anleitungen vermitteln Sie Ihren Teilnehmern, wie sich Felder und Formulare ohne großen Aufwand einrichten lassen. Das Thema Object Linking and Embedding – OLE, das Verknüpfen und Einbetten von Objekten, wird vor allem praktisch betrachtet. Nachvollziehbare Beispiele belegen, dass Word äußerst flexibel ist. Anhand der Kursunterlagen gewinnen Ihre Schulungsteilnehmer ebenso Einblick in den Dynamischen Datenaustausch – DDE unter Windows innerhalb einer lokalen Ebene und in Netzwerken. Das Schulungsmaterial erläutert anschaulich das Anlegen von Makros, um effektiver zu arbeiten. Geht es um Teamarbeit, ist die verknüpfende Anwendung SharePoint–Server für Aufgaben und Dokumente gefragt.
Die digitalen Kursunterlagen aus unserem Verlag im Word-Format ermöglichen Ihnen, individuelles Schulungsmaterial zu erstellen. Design und firmenspezifische Angaben sind anpassbar. Ihre Teilnehmer erhalten die Anleitungen als fertigen Ausdruck oder nutzen den Kurs als pdf-Datei im Firmen- oder Behörden-Intranet. Neben der englischen Ausgabe können Sie parallel die deutschsprachige Schulungsvariante einsetzen.
↓ Inhalt als PDF → Einführung Word 2016 ← Alle Office 2016 Schulungsunterlagen in Englisch______________________________________________________________________________________________________________________________
Video: Why use the Quick Access Toolbar? | Office Videos
https://www.youtube.com/watch?v=H5VPB3tTOho